Using ChainIDE to store and retrieve Employees Information on Blockchain with an interactive interface
-
In this beginner tutorial, we introduce a system to store employee data on the blockchain and retrieve the stored data from the blockchain using a front-end web page created using HTML and CSS.

Pre-requisite:
To follow this tutorial, you need to have a basic knowledge of the following programming languages:- HTML: HTML is used to design the structure of the website
- JavaScript: Javascript is used for interacting with the deployed smart contracts to store, retrieve, and manipulate information
- Solidity: solidity is used for writing down smart contracts
Tools Requirement:
Following are the tools that are required to implement this tutorial:- ChainIDE [an online cloud-based, multi-chain IDE] available at: https://chainide.com/. ChainIDE is the world's best IDE with Multi-Chain support.
- MetaMask [a wallet for web3], available at: https://metamask.io/.
Adds MetaMask's legacy window.web3 API to your browser.
!Note: For this tutorial, you don't need to download any tools or libraries except MetaMask and web3.js.
Libraries:
web3.js [web3.js is a collection of libraries that allow you to interact with a local or remote ethereum node using HTTP, IPC, or WebSocket], available at:
"https://cdn.jsdelivr.net/gh/ethereum/web3.js/dist/web3.min.js"Experiment Setup:
Once you have access to ChainIDE and MetaMask, connect MetaMask to ChainIDE and buy some ethers from a faucet for any of the following test networks:- Ropsten Test Network (suggested)
- Kovan Test Network
- Rinkbey Test Network
- Goreli Test Network

-
To get test ethers from a faucet, simply click choose any of the above-mentioned networks and click on Buy →Test Faucet → Get Ether, and you will be redirected to the selected faucet network. This method varies a little from network to network but all are quite easy.
-
After adding the extension of MetaMask to your browser, make sure you have selected the faucet network.
Method -
First of all, we will write down a smart contract that can store the employee's information such as id, first name, last name, address, mobile number, etc.,
!Note: We'll use ChainIDE for the whole tutorial, ChainIDE supports all the programming languages that are needed to complete this tutorial.
   pragma solidity =>0.5.1 <0.7.0;

  contract employees_records
 {
 int id;
 string f_name;
 string last_name;
 string address_;
 string mob_no;


function store_information (uint _id, string _f_name, string _last_name, string _address_, string _mob_no ) public
    {
     id= _id;
     f_name= _f_name;
     last_name= _last_name;
     address_= _address_
     mob_no= _mob_no;
    }

function retrive_information(uint, string, string, string, string) public view returns
    {
     return(id, f_name, last_name, address_, mob_no);
    }

  }
Following code is a smart-contract written in solidity that is used to store the employee's information on the blockchain. To make use of this smart contract, we need to deploy it on the blockchain, and before, we can deploy it, we need to compile it.
The pragma keyword defines the compiler version that we will use to compile the solidity code. Once you have completed writing down your smart contract, simply compile it from the compile panel, and you will get the ABI code for the following solidity code.
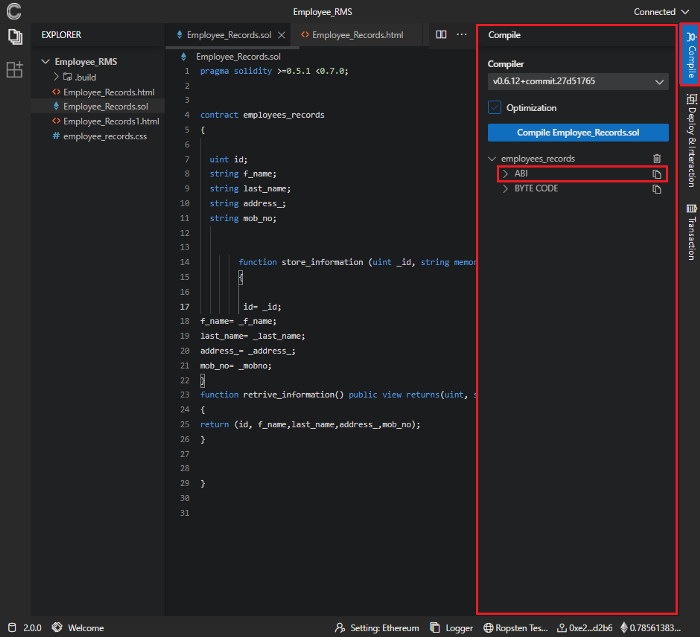
The ABI which is known as the application binary interface is needed when you want to interact with the smart contract using web3.
Now, the next step is to deploy the complied smart contract.
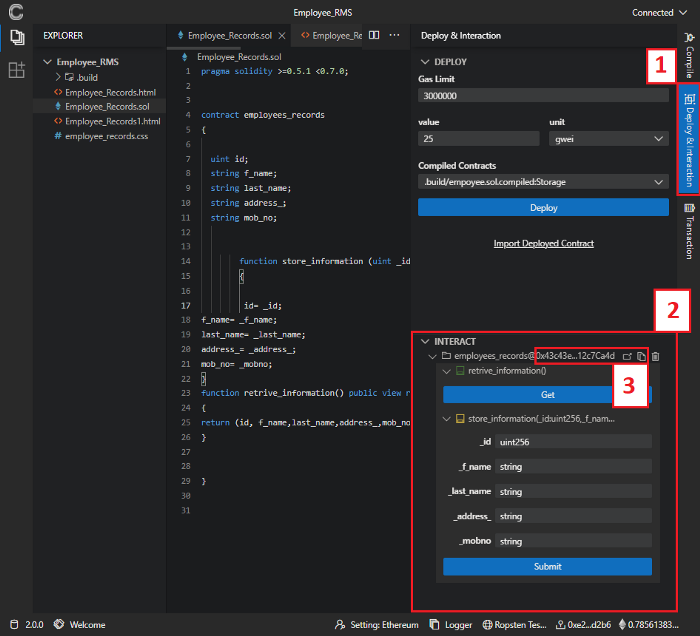
Contract Deployment : To deploy a smart contract, you must need to have some faucet ethers in your wallets to pay a gas fee to deploy for the smart contract. In the figure below, we can see we paid 25 gwei to deploy our "Employee_Records.sol" smart contract.
Once a smart contract is deployed, it will be assigned a contract address, as we can see in fig.4, highlighted pint 3, and from the interaction panel, we can copy our smart contract address and can check our deployed smart contract on the faucet network also.
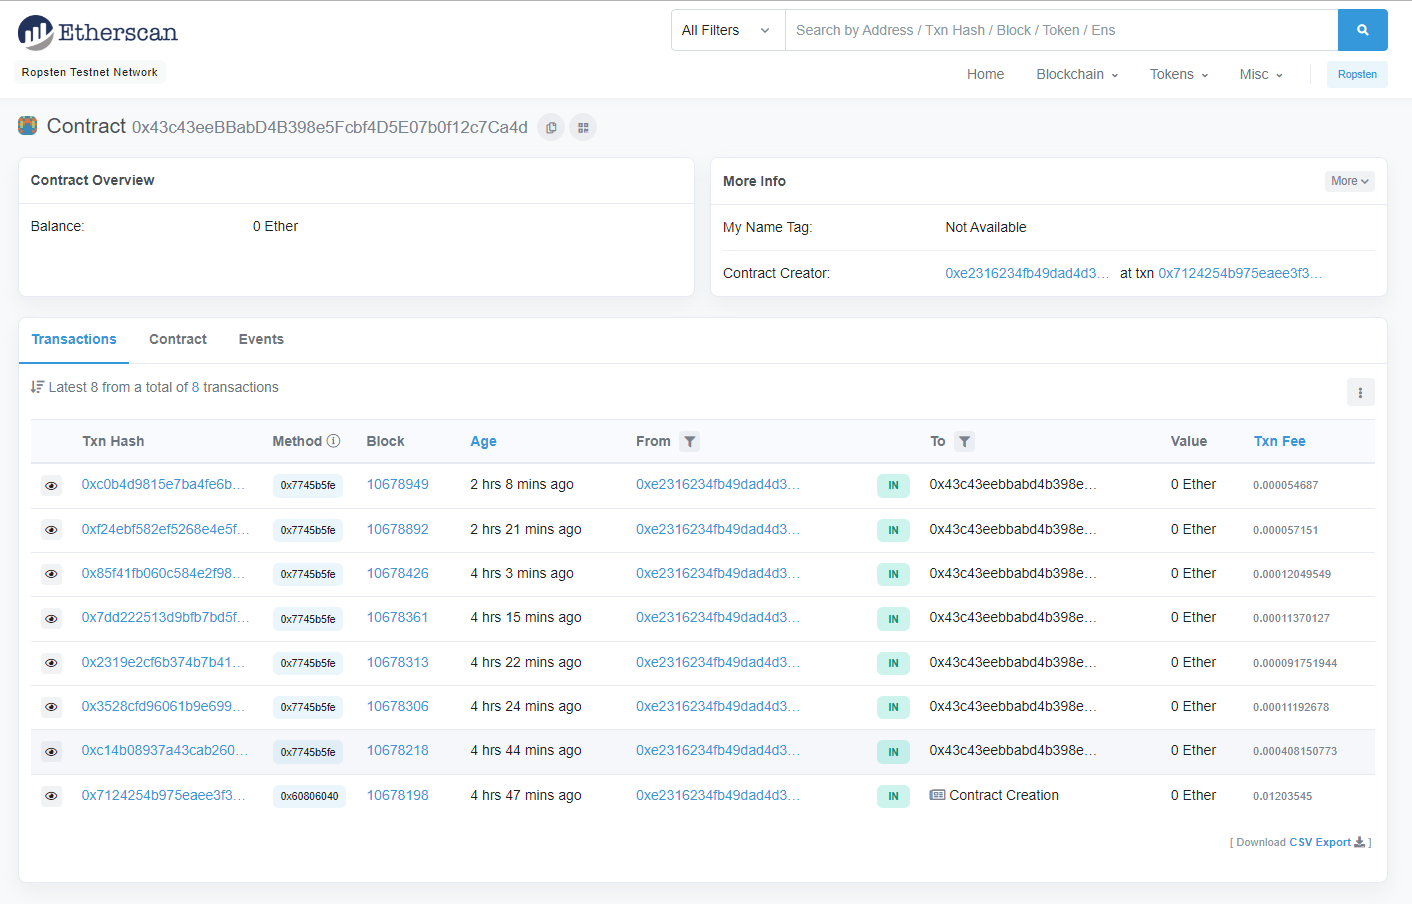
EtherScan for the Ropsten Test Network: We can see all the information about the contract such as all the transactions information that is made to a smart contract, gas fee used for each transaction, etc., from the EtherScan.
Until this, we have successfully deployed smart contract on the blockchain and we can interact with the deployed smart contract using the "INTERACT" panel of ChainIDE.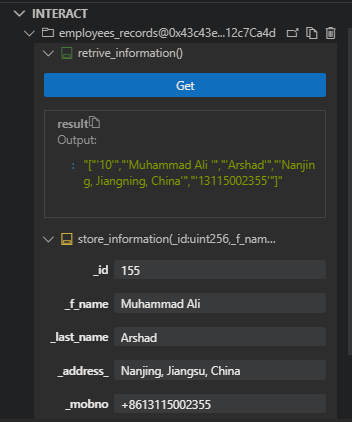
But we want to create a custom interface to interact with the deployed smart contract, so for that, we will first create the webpage structure using simple HTML tags and a little CSS to make it good-looking.
      ```<html>
     <head>
    <title>www.ems.co</title>
    <link rel="stylesheet" type="text/css" href="employee_records.css">
    <script src='https://cdn.jsdelivr.net/gh/ethereum/web3.js/dist/web3.min.js'></script>
</head>
    <body>
     <div id ="heading"> <h1> Blockchain Based Employee Record Management System</h1><div class="wrapper">
<div class="form-signin">
  <h2 class="form-signin-heading">Please Enter Your Information</h2>
   <input type="text" class="form-control" id="id" name="username" placeholder="Id" required="" autofocus="" />
   <input type="text" class="form-control" id="f_name" name="username" placeholder="First Name" required="" autofocus="" />
   <input type="text" class="form-control" id="l_name" name="username" placeholder="Last Name" required="" autofocus="" />
   <input type="text" class="form-control" id="address" name="username" placeholder="Address" required="" autofocus="" />
    <input type="text" class="form-control"id="mob_no" name="username" placeholder="Mob-No" required="" autofocus="" />
  <button class="btn btn-lg btn-primary btn-block"  onclick="store_information();">Save</button>  </div></div><div class="wrapper">
<div class="form-signin">
  <h2 class="form-signin-heading">Please Click to See Your Saved Information</h2>
  <button class="btn btn-lg btn-primary btn-block"  onclick="retrive_information();">Show</button>
  </br>
   <div  id="id_1"></div>
   <div class="form-control" id="name_1"></div>
   <div class="form-control" id="last_name_1"></div>
   <div class="form-control" id="address_1"></div>
   <div class="form-control" id="mob_no_1"></div>
  </div>
   </div>
   </div>
 <script type="text/javascript">
</script>
 </body>
 </html>
**CSS for the Webpage is following:** ``` @import "bourbon"; #heading{ font: italic small-caps bold 14px/2 cursive; margin: auto; width: 50%; border: 3px solid pink; padding: 10px; } body { background: # !important; } .wrapper { margin-top: 70px; margin-bottom: 70px; } .form-signin { max-width: 380px; padding: 50px 35px 45px; margin: 0 auto; background-color: #fff; border: 1px solid rgba(1,2,500,0.1); .form-signin-heading, .checkbox { margin-bottom: 20px; } .form-control { position: relative; font-size: 20px; height: auto; padding: 20px; color: pink; @include box-sizing(border-box); &:focus { z-index: 2; } } input[type="text"] { margin-bottom: -1px; border-bottom-left-radius: 0; border-bottom-right-radius: 0; } input[type="password"] { margin-bottom: 20px; border-top-left-radius: 0; border-top-right-radius: 0; } }Until this, our webpage would be like this,
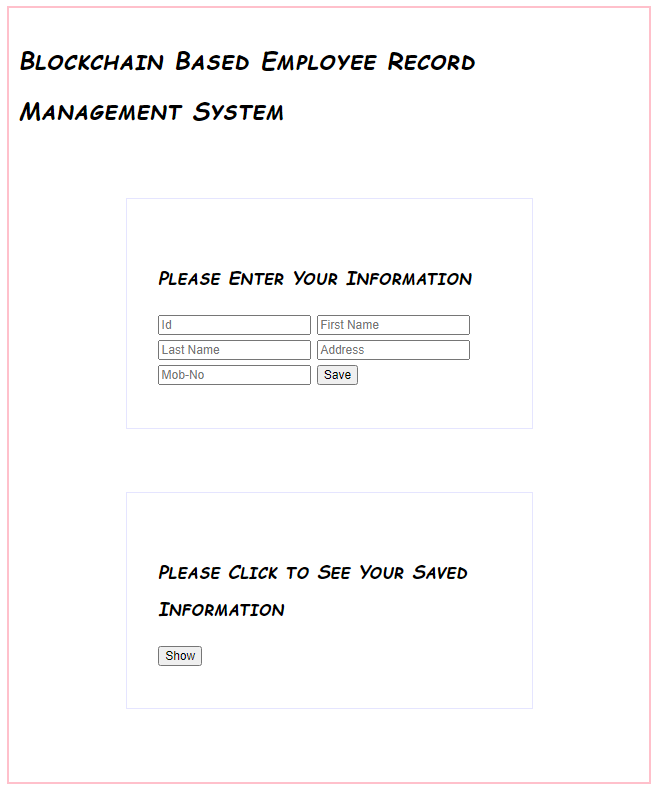
A webpage using HTML and CSSThis is just a structure for the webpage, but still not integrated with our deployed smart contract and it can not be used to store value on the blockchain and retrieve the stored values from the blockchain, for that we would need Web3.js, and JavaScript language. The below code needs to be pasted between the
<script type="text/javascript">
</script> tags.async function loadWeb3() { if (window.ethereum) { window.web3 = new Web3(window.ethereum); window.ethereum.enable() } } async function loadContract() { // set ABI var abi = [{"inputs":[],"name":"retrive_information","outputs":[{"internalType":"uint256","name":"","type":"uint256"},{"internalType":"string","name":"","type":"string"},{"internalType":"string","name":"","type":"string"},{"internalType":"string","name":"","type":"string"},{"internalType":"string","name":"","type":"string"}],"stateMutability":"view","type":"function"},{"inputs":[{"internalType":"uint256","name":"_id","type":"uint256"},{"internalType":"string","name":"_f_name","type":"string"},{"internalType":"string","name":"_last_name","type":"string"},{"internalType":"string","name":"_address_","type":"string"},{"internalType":"string","name":"_mobno","type":"string"}],"name":"store_information","outputs":[],"stateMutability":"nonpayable","type":"function"}] //set contract address var contractAddress = '0x43c43eeBBabD4B398e5Fcbf4D5E07b0f12c7Ca4d'; return await new window.web3.eth.Contract(abi,contractAddress); } async function store_information() { await window.contract.methods.store_information(document.getElementById("id").value, document.getElementById("f_name").value, document.getElementById("l_name").value, document.getElementById("address").value, document.getElementById("mob_no").value, ).send({from: '0xE2316234Fb49DaD4D3a57F08ed0BaD3CC590D2B6'}) .then(function(receipt){ // receipt can also be a new contract instance, when coming from a "contract.deploy({...}).send()" }); } async function retrive_information() { load(); await window.contract.methods.retrive_information().call({from: '0xE2316234Fb49DaD4D3a57F08ed0BaD3CC590D2B6'}, function(error, result){ document.getElementById("id_1").innerHTML = "Your ID is : " + result[0]; document.getElementById("name_1").innerHTML = "Your First Name is : " + result[1]; document.getElementById("last_name_1").innerHTML = "Your Last Name is : " + result[2]; document.getElementById("address_1").innerHTML = "Your Address is : " + result[3]; document.getElementById("mob_no_1").innerHTML = "Your Mobile No is : " + result[4]; }); } async function load() { await loadWeb3(); window.contract = await loadContract(); } load();That's all, now, you can use your webpage to store and load your employee's information to/from the blockchain.
The final look should be like the given image below.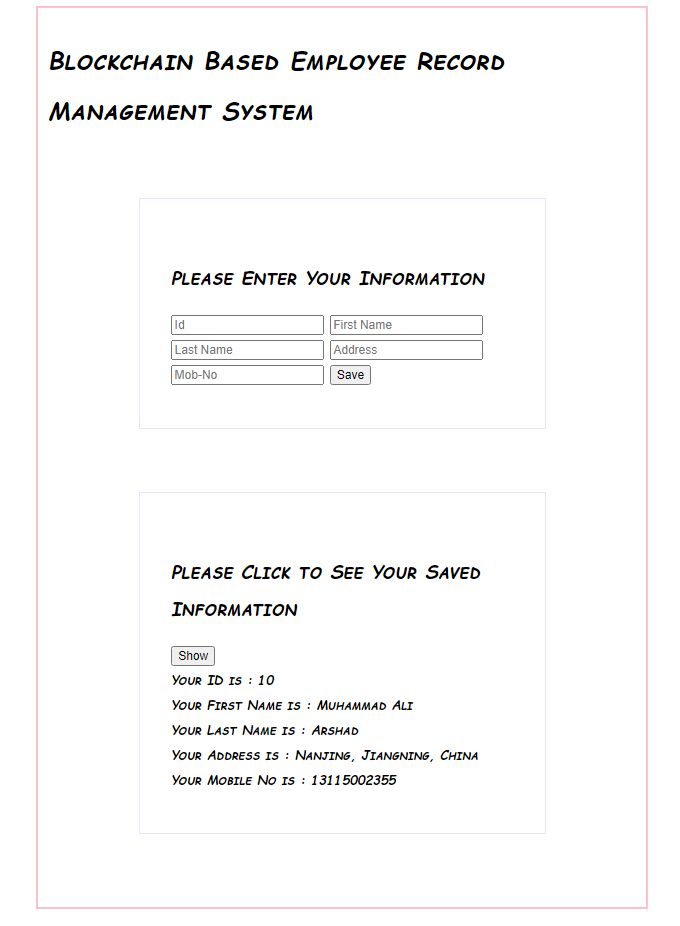
If you face any problems while implementing this tutorial, please ask in the comments,. Thanks
If you want to learn more about blockchain and discuss some ideas with members from academia and industry, you are welcome to join our Telegram or Discord group.Telegram Group:
https://t.me/joinchat/Q48BNwB-f8RlZTJl.
Discord Group:
https://discord.gg/pPhJMJ3Kp7Code Availability:
All the code used in this tutorial is available at: https://github.com/AliArshadswl/Employee_RMS_BlockchainReferences:
web3.js - Ethereum JavaScript API - web3.js 1.0.0
Solidity - Solidity 0.8.6 documentation
Solidity is an object-oriented, high-level language for implementing smart contracts. Smart contracts are programs… -
Now the casino to play really very profitable, because there you can earn the most real money. I earn, and features mr bet casino mr bet casino that you can really make good profit on it.
-
We work hard to ensure that your mobile apps are the best in the business. Quytech is the top mobile app development company in Dallas, providing clients all over the world with creative mobile app development services. Our developers have decades of hands-on experience with cutting-edge technology, allowing them to develop unique mobile apps.
-
Exploring ChainIDE's innovative approach to storing employee information on the blockchain is fascinating! The interactive interface adds a unique dimension to the process. As we delve into the world of blockchain, the concept of 3 Patti Blue Tricks becomes increasingly intriguing, promising a distinctive and efficient solution in this evolving landscape.
-
Ich habe bei Webseite Philosophieaufsätze mit einem unkonventionellen Thema bestellt, und ich kann sagen, dass die Autoren Kreativität und ein tiefes Verständnis des Themas gezeigt haben. Sie sind bereit, sich mit komplexen und untypischen Themen zu befassen, was der Arbeit einen interessanten und originellen Charakter verleiht. Wenn Sie eine kreative Herangehensweise brauchen, wird dieser Service definitiv genügen!